HQ - Term. GK Librarian, ML 3
HQ - Coteaz
HQ - Inquisitor, x2 Servo Skulls
HQ - Inquisitor
Troop - Strike Squad x5, Incinerator
Troop - Strike Squad x5, Incinerator
Elite - Henchmen - Psyker x1, Acolytes /w Plasma Guns x3, Servitors /w MM x3, Chimera /w 2 heavy bolters and psybolt ammo
Elite - Henchmen - Psyker x1, Acolytes /w Plasma Guns x3, Servitors /w MM x3, Chimera /w 2 heavy bolters and psybolt ammo
Elite - Henchmen - Psyker x1, Acolytes /w Plasma Guns x3, Servitors /w MM x3, Chimera /w 2 heavy bolters and psybolt ammo
Heavy Support - Dreadknight, Teleporter, Greatsword, H. Incinerator, H. Psycannon
Heavy Support - Dreadknight, Teleporter, Greatsword, H. Incinerator, H. Psycannon
Heavy Support - Dreadknight, Teleporter, Greatsword, H. Incinerator, H. Psycannon
Imperial Knight - Errant

Showing posts with label Grey Knights. Show all posts
Showing posts with label Grey Knights. Show all posts
Tuesday, December 16, 2014

I'm toying with a new 2,000 point list...
For an upcoming tournament, I need to craft another 2,000 point list to try to bring the pain. While I've picked up everything I could to make pretty much any Grey Knights army (sans Stormravens - for now), it isn't scratching the part of me that loves a good conversion. So adding in a supple amount of Inquisition seems like a no brainer. And an Imperial Knight. Three Imperial Knights are a liability, I feel, but one truly increases the durability of the rest of your armor (because if the Knight isn't dealt with quickly then it starts to do it's thang).
With no Detachment limit in place, how about:
With no Detachment limit in place, how about:
Thursday, December 11, 2014
Kaldor Draigo is completed...
I finished up Draigo. It took a bit longer than I wanted, but was trying to make sure the methods used would be duplicated through the rest of the army pretty quickly. I have some commission work coming up, so hopefully I can get some more Grey Knights on my painting table soon. Now if only I could figure out a basing concept...
 |
| Kaldor Draigo |
Battle/Tournament Report #3: A win!
We only had a few people turn up for the local tournament, but that was kind of expected on a holiday/shopping weekend. When I arrived the tables that were set up were scarce of any real terrain. I tried to petition for a bit more ruins and LOS stuff, but the tables didn't change at all. So all the games were pretty much played in a shooting gallery with a forests and craters filling the tables, but a model in one corner could pretty easily see a model placed in the opposite corner... which is not really how 40k should be played. Oh well. This was an advantage for my army, as no one had anywhere to hide. The missions were all Eternal War, and it felt like we were a bit back in 6th edition with that. Maelstrom of War missions are very beneficial to everyone, as you can play to the strengths of your own army and try to exploit the weaknesses of your opponents. Eternal War missions are just about bullying the other player until the have nothing left to really threaten end game objective grabbing.
I brought my 2,000 point tournament list.
Game 1 vs. Tau
My opponent's list was a ton of commanders with drone commander and markerlight drones, each breaking up to be placed in one of four units of 2 Crisis Suits with missile pods each. He had 1 Riptide with Ion Cannon, 2 Hammerheads, and a Skyray. There were 2 Crisis Suits with Fusion Blasters in reserves.
Deployment was Vanguard Strike and the mission was Crusade with four objectives. I made sure each objective I had to place was pretty center-field, as I wanted to go for his throat in assaults. My warlord trait ended up being Move Through Cover and Stealth (Ruins), and amusingly we played on the one table with some ruins on the very back sides of each table edge. He got +1 to steal the initiative with his Warlord trait, which after a special thing he had put him at +2. I deployed to shunt into his face, and he deployed to shoot at mine, while keeping a few things a bit safe in case he didn't seize on me.
He seized. His first turn of shooting went fine. Overall I had 1 Dreadknight lose 2 wounds. He assault moved a bit to shuffle some things around. My first turn shunted all my Dreadknights in his throat, while keeping a 5-man combat squaded Interceptor unit in my backfield behind the only LOS that would help them for a late game objective grab. My terminators moved up a bit and tossed Invisibility on a Dreadknight and then ran forward. After all of my shooting I ended up immobilizing the Skyray, killing about 2 Crisis suits between a few units, and taking out about 7 or 8 marker light drones between his four crisis suit squads. Three had to make Morale checks, but all passed.
On his turn 2 he made both of his reserve rolls for his Fusion blaster crisis suits. Each squad came in, and each mis-haped in the same fashion. I was allowed to place them where I wanted, so I put them in my back corners - forcing them to move through my entire power armored marines before they could do what they needed... take down Dreadknights. He killed a Dreadknight in shooting and assault moved a bit back. My turn two had me grab some objectives, as we were closing in on time for the round (we weren't really playing slowly, but we only had 2 hour rounds with deployment on the clock). I shot more stuff, taking down quite a few Crisis Suits. I assaulted a Skyray and both Hammerheads and took them all down. Time was called and I had 7 VPs to his 5.
Game 2 vs. Orks
This game was against a good friend of mine, and it was a bit amusing that he switched to playing his Orks when I switched to Grey Knights. Unfortunately he was going to have trouble against my army, and this particular mission made the bout even worse. Purge the Alien. We had Dawn of War deployment and I won the roll off to deploy and go first. I got the Infiltrate Warlord Trait, so I held back three of my Dreadknights to counter deploy against his army. He deployed to suck up as much damage as he could, and I deployed to do as much. I was heavy on killing capability on my right side, as I wanted to thrust in some units to throw away my left flank so I could work my way to his right.
His list was the same as before (Battle Report 1), but he switched out a battlewagon and boys for some 2 units of Lootas and 2 units of Kannons for some firepower.
He failed to Seize on me and I shunted most of my army, sans 2 of the Dreadknights. I did a risky deep strike with my Strike squad, but it paid off as the didn't scatter. I chased a unit of lootas and kannons off the board, and did a reasonable amount of damage. I put Invisibility on a front Dreadknight that was blocking off major charge lanes to some other things. He unloaded bullets and charges, but after three complete turns of combat I was up 15 VPs to his 7. A Dreadknight in a particular pivotal combat ended up rolling Perils and got a '6' result from casting Sanctuary, so he ended up with a 2++. Between the mission and the open terrain, it was a battle that would have taken a miracle of bad rolling for me to lose.
Game 3 vs. Space Wolves
I was dreading facing this army as it had some trouble stuff for my army. I was ahead in VPs by a pretty huge margin, and everyone else was already 1 and 1 going in, as I was the only undefeated player in this small tournament. My hubris almost got the best of me.
His list was something like Bjorn, Dreadnought, 2 Razorbacks /w 5-man Grey Hunters (each with Power Fist and Flamer), a 10-man Blood Claw unit with 2 power fists and plasma pistol, an Iron Priest, a Wolf Lord with Storm Shield and Wolf Claw, a 3-man Thunderwolf Cavalry unit with Storm Shields, and 7 Terminators in a Stormfang(Stormwolf?). It could do some serious damage, and it did.
The deployment type was Dawn of War, and the mission was the Relic. I opted to go first and set up first, so I created a line of models ready to shunt. He fortressed up in the middle of his deployment area. I was seized on and everything moved forward. He did two wounds to a Dreadknight in his first turn of shooting. I did some pretty poor planning and put a lot of my units in charge range for next turn. I ended up rolling a bit adequately in the shooting phase, but only really took down the Dreadnought. I positioned a unit of Interceptors and Dreadknight (who was invisible) to charge his Thunderwolves. I killed two thunderwolves and we got locked in combat.
Turn 2 had the Terminators come in the Stormfang/wolf. The flier took down a Dreadknight. Bjorn charged a Dreadknight and ended up making three 5++ saves and then tore my Dreadknight to death. My invisible dreadknight ended up getting hit twice with a Frost Axe and almost went down. In hindsight, I should have challenged with my Dreadknight to force the wounds on his Wolf Lord. My turn 2 had my Terminators turn Invisible and charge into the thunderwolves, which ended up taking them all down. I tried to force my full HP Dreadknight down Bjorns throat, but failed the charge range.
His turn 3 saw some Grey Hunter charges into my Interceptor units, who were quite wounded. They managed to get some attacks off and take down most of each squad, however. His terminators charged my invisible terminators after getting out and picking up the Relic. He charged 5 inches and ended up having to consolidate his Relic holder, which put him at more than 6" during any phase, so he dropped the relic. Bjorn ignored the DK I was trying to get into him. My wounded Dreadknight went into the Stormfang/wolf while it was hovering as it had no other chance to kill it. My full Dreadknight shunted over to the relic and ran back, as I expected my Terminators to tie up his terminators since I had a bit of an upper hand since they were invisible.
Bjorn charged into the DK that took down the Stormfang/wolf and smashed it to bits. The small amount that was left shuffled about and shot at what they could. Terminators did damage to each other. I tried to charge my DK into a nearby unit of Grey Hunters, but failed. Invisibility went off on my Terminators, and Sanctuary went off on my DK. Time was called, and with the Relic I had 4 VPs to his 1.
-------------------------------
Overall I had a lot of fun, but if I knew the turnout was going to be lite I would have tried a bit harder to build more than a pretty obnoxious list in such a friendly tournament. No one brought a Lord of War or an Imperial Knight, minus our local Chaos Daemons player who brought the Forgeworld Nurgle dude. I'm going to break down my list a bit later so I can start some serious painting, so I'll be building another 1500-2000 point list to play while stuff is on my painting table. I'm researching some interesting Inquisition conversion ideas now.
I brought my 2,000 point tournament list.
Game 1 vs. Tau
My opponent's list was a ton of commanders with drone commander and markerlight drones, each breaking up to be placed in one of four units of 2 Crisis Suits with missile pods each. He had 1 Riptide with Ion Cannon, 2 Hammerheads, and a Skyray. There were 2 Crisis Suits with Fusion Blasters in reserves.
Deployment was Vanguard Strike and the mission was Crusade with four objectives. I made sure each objective I had to place was pretty center-field, as I wanted to go for his throat in assaults. My warlord trait ended up being Move Through Cover and Stealth (Ruins), and amusingly we played on the one table with some ruins on the very back sides of each table edge. He got +1 to steal the initiative with his Warlord trait, which after a special thing he had put him at +2. I deployed to shunt into his face, and he deployed to shoot at mine, while keeping a few things a bit safe in case he didn't seize on me.
He seized. His first turn of shooting went fine. Overall I had 1 Dreadknight lose 2 wounds. He assault moved a bit to shuffle some things around. My first turn shunted all my Dreadknights in his throat, while keeping a 5-man combat squaded Interceptor unit in my backfield behind the only LOS that would help them for a late game objective grab. My terminators moved up a bit and tossed Invisibility on a Dreadknight and then ran forward. After all of my shooting I ended up immobilizing the Skyray, killing about 2 Crisis suits between a few units, and taking out about 7 or 8 marker light drones between his four crisis suit squads. Three had to make Morale checks, but all passed.
On his turn 2 he made both of his reserve rolls for his Fusion blaster crisis suits. Each squad came in, and each mis-haped in the same fashion. I was allowed to place them where I wanted, so I put them in my back corners - forcing them to move through my entire power armored marines before they could do what they needed... take down Dreadknights. He killed a Dreadknight in shooting and assault moved a bit back. My turn two had me grab some objectives, as we were closing in on time for the round (we weren't really playing slowly, but we only had 2 hour rounds with deployment on the clock). I shot more stuff, taking down quite a few Crisis Suits. I assaulted a Skyray and both Hammerheads and took them all down. Time was called and I had 7 VPs to his 5.
Game 2 vs. Orks
This game was against a good friend of mine, and it was a bit amusing that he switched to playing his Orks when I switched to Grey Knights. Unfortunately he was going to have trouble against my army, and this particular mission made the bout even worse. Purge the Alien. We had Dawn of War deployment and I won the roll off to deploy and go first. I got the Infiltrate Warlord Trait, so I held back three of my Dreadknights to counter deploy against his army. He deployed to suck up as much damage as he could, and I deployed to do as much. I was heavy on killing capability on my right side, as I wanted to thrust in some units to throw away my left flank so I could work my way to his right.
His list was the same as before (Battle Report 1), but he switched out a battlewagon and boys for some 2 units of Lootas and 2 units of Kannons for some firepower.
He failed to Seize on me and I shunted most of my army, sans 2 of the Dreadknights. I did a risky deep strike with my Strike squad, but it paid off as the didn't scatter. I chased a unit of lootas and kannons off the board, and did a reasonable amount of damage. I put Invisibility on a front Dreadknight that was blocking off major charge lanes to some other things. He unloaded bullets and charges, but after three complete turns of combat I was up 15 VPs to his 7. A Dreadknight in a particular pivotal combat ended up rolling Perils and got a '6' result from casting Sanctuary, so he ended up with a 2++. Between the mission and the open terrain, it was a battle that would have taken a miracle of bad rolling for me to lose.
Game 3 vs. Space Wolves
I was dreading facing this army as it had some trouble stuff for my army. I was ahead in VPs by a pretty huge margin, and everyone else was already 1 and 1 going in, as I was the only undefeated player in this small tournament. My hubris almost got the best of me.
His list was something like Bjorn, Dreadnought, 2 Razorbacks /w 5-man Grey Hunters (each with Power Fist and Flamer), a 10-man Blood Claw unit with 2 power fists and plasma pistol, an Iron Priest, a Wolf Lord with Storm Shield and Wolf Claw, a 3-man Thunderwolf Cavalry unit with Storm Shields, and 7 Terminators in a Stormfang(Stormwolf?). It could do some serious damage, and it did.
The deployment type was Dawn of War, and the mission was the Relic. I opted to go first and set up first, so I created a line of models ready to shunt. He fortressed up in the middle of his deployment area. I was seized on and everything moved forward. He did two wounds to a Dreadknight in his first turn of shooting. I did some pretty poor planning and put a lot of my units in charge range for next turn. I ended up rolling a bit adequately in the shooting phase, but only really took down the Dreadnought. I positioned a unit of Interceptors and Dreadknight (who was invisible) to charge his Thunderwolves. I killed two thunderwolves and we got locked in combat.
Turn 2 had the Terminators come in the Stormfang/wolf. The flier took down a Dreadknight. Bjorn charged a Dreadknight and ended up making three 5++ saves and then tore my Dreadknight to death. My invisible dreadknight ended up getting hit twice with a Frost Axe and almost went down. In hindsight, I should have challenged with my Dreadknight to force the wounds on his Wolf Lord. My turn 2 had my Terminators turn Invisible and charge into the thunderwolves, which ended up taking them all down. I tried to force my full HP Dreadknight down Bjorns throat, but failed the charge range.
His turn 3 saw some Grey Hunter charges into my Interceptor units, who were quite wounded. They managed to get some attacks off and take down most of each squad, however. His terminators charged my invisible terminators after getting out and picking up the Relic. He charged 5 inches and ended up having to consolidate his Relic holder, which put him at more than 6" during any phase, so he dropped the relic. Bjorn ignored the DK I was trying to get into him. My wounded Dreadknight went into the Stormfang/wolf while it was hovering as it had no other chance to kill it. My full Dreadknight shunted over to the relic and ran back, as I expected my Terminators to tie up his terminators since I had a bit of an upper hand since they were invisible.
Bjorn charged into the DK that took down the Stormfang/wolf and smashed it to bits. The small amount that was left shuffled about and shot at what they could. Terminators did damage to each other. I tried to charge my DK into a nearby unit of Grey Hunters, but failed. Invisibility went off on my Terminators, and Sanctuary went off on my DK. Time was called, and with the Relic I had 4 VPs to his 1.
-------------------------------
Overall I had a lot of fun, but if I knew the turnout was going to be lite I would have tried a bit harder to build more than a pretty obnoxious list in such a friendly tournament. No one brought a Lord of War or an Imperial Knight, minus our local Chaos Daemons player who brought the Forgeworld Nurgle dude. I'm going to break down my list a bit later so I can start some serious painting, so I'll be building another 1500-2000 point list to play while stuff is on my painting table. I'm researching some interesting Inquisition conversion ideas now.
faux-Battle Report #2 : vs. Tau
I had a game against a friend last night. I asked him to bring the pain at 2,000 points, and that he did. He ran something like:
-Ethereal, Longstrike? (hammerhead character guy)
-Pathfinders x2 units
-Riptides x3 (all with the melta and Ion Cannon)
-Crisis Suits x2 units (one was super plasma-based)
-Devilfish /w a 6-man unit of Fire Warriors
- 6-man Fire Warriors
-Skyray
-Little AV 10 skimmer vehicles with twin-linked marker lights (forgeworld, I believe)
-Void Shield Generator
*Sorry it's so lite on information, but I don't much about Tau
I took my 2,000 point Tournament list:
Nemesis Strike Force Detachment: (there are two detachments in the below slots)
HQ - Librarian, ML 3
HQ - Librarian, ML 3
Troop - Strike Squad x5, Incinerator
Troop - Terminators x5, Daemon Hammer, Psycannon
Fast Attack - Interceptors x10, x2 Incinerator
Fast Attack - Interceptors x10, x2 Incinerator
Heavy Support - Dreadknight, Sword, Teleporter, Heavy Psycannon, Heavy Incinerator
Heavy Support - Dreadknight, Sword, Teleporter, Heavy Psycannon, Heavy Incinerator
Heavy Support - Dreadknight, Sword, Teleporter, Heavy Psycannon, Heavy Incinerator
Heavy Support - Dreadknight, Sword, Teleporter, Heavy Psycannon, Heavy Incinerator
My warlord trait was re-rolled and I ended up getting -1 to my opponent's reserve rolls twice. He got the one where he chooses three of my units and they make a pinning check (and as far as I know, Dreadknights aren't fearless). We got the hidden tactical objectives mission and were on Hammer and Anvil deployment. We didn't roll off for sides or first turn, as I wanted him to do as much damage as possible to see what my army can weather - so I just let him choose both. I rolled off for powers, but I made mistakes again. I did end up with Invisibility, but opted for rolling on Santic with my Warlord Librarian. With such small units running around on my side, I'm not sure fishing for Invisibility was the best idea. I decided against Deep Striking anything in (and without Gate of Infinity walking the terminators acrossed the board was painful), because the name of this game for me wasn't about winning but just trying to endure what I could.
First turn he failed to do any significant damage. I was out of range of most of his guns. He shot two Interceptors dead and they ended up failing morale. I'll note now that my dice were ridiculous. I was literally rolling 1s and 2s or 5s and 6s - there was no middle ground. I'm pretty sure I rolled about average, but ended up rolling 1s and 2s for saving throws, and 5s and 6s for casting powers and morale and the like. My dice were possessed with a Chaos Daemon that wanted my Grey Knights to fail. When it was my turn, I shunted three of my Dreadknights in front of his army and inside the Void Shield (why not 4? well, one of my Dreadknights failed that Pinning warlord thing...awesome). I decided against shunting all my Interceptors, but in hindsight that was a bad idea. He was playing to do damage, so playing total gunline. I should have given myself some Turn 2 charges by placing the majority of my army in his face instead of just three Dreadknights. I cast powers and he denied 1 Sanctuary, but the other two suffered Perils (all those Perils I should have gotten in my game against you came out in this one) - and each Perils was a friggin' result of 1. Blargh. I passed my Leadership checks, sure, but ended up killing half a Dreadknight worth of Wounds on my own. I cast Invisibility on the Terminator unit, but I should have tossed it on a Dreadknight that was in his face. I killed some stuff, but nothing significant. So I had to endure his next round of shooting to get off some Dreadknight charges next turn...
...and three Dreadknights died. It took his entire armies' firepower, but he did manage to finish off every wound on the three Dreadknights I had. I was rolling pretty poorly on a lot of saves, so that's nice to be aware of. If I hadn't Perils in the worst way during Turn 1 it was pretty likely I'd have two alive Dreadknights ready to charge (even if they were a bit wounded it would have been enough to start wrecking stuff). My un-Pinned Dreadknight shunted along with my Interceptors. I did some damage, but nothing significant. I tossed Invisibility on to the lone Dreadknight, but it wouldn't matter in the end. The game went on another turn or so before I gave up when he brought down the last Dreadknight in Overwatch.
In the end, I learned exactly what I set out to - the durability of my army while facing down a ridiculously fierce shooting list with the worst odds against me (not having a choice of deployment, going first, and the worst deployment type against a gunline army). There were obvious things I could have done better, but I opted to play a bit more simply to better gauge my armies' defenses.
-Ethereal, Longstrike? (hammerhead character guy)
-Pathfinders x2 units
-Riptides x3 (all with the melta and Ion Cannon)
-Crisis Suits x2 units (one was super plasma-based)
-Devilfish /w a 6-man unit of Fire Warriors
- 6-man Fire Warriors
-Skyray
-Little AV 10 skimmer vehicles with twin-linked marker lights (forgeworld, I believe)
-Void Shield Generator
*Sorry it's so lite on information, but I don't much about Tau
I took my 2,000 point Tournament list:
Nemesis Strike Force Detachment: (there are two detachments in the below slots)
HQ - Librarian, ML 3
HQ - Librarian, ML 3
Troop - Strike Squad x5, Incinerator
Troop - Terminators x5, Daemon Hammer, Psycannon
Fast Attack - Interceptors x10, x2 Incinerator
Fast Attack - Interceptors x10, x2 Incinerator
Heavy Support - Dreadknight, Sword, Teleporter, Heavy Psycannon, Heavy Incinerator
Heavy Support - Dreadknight, Sword, Teleporter, Heavy Psycannon, Heavy Incinerator
Heavy Support - Dreadknight, Sword, Teleporter, Heavy Psycannon, Heavy Incinerator
Heavy Support - Dreadknight, Sword, Teleporter, Heavy Psycannon, Heavy Incinerator
My warlord trait was re-rolled and I ended up getting -1 to my opponent's reserve rolls twice. He got the one where he chooses three of my units and they make a pinning check (and as far as I know, Dreadknights aren't fearless). We got the hidden tactical objectives mission and were on Hammer and Anvil deployment. We didn't roll off for sides or first turn, as I wanted him to do as much damage as possible to see what my army can weather - so I just let him choose both. I rolled off for powers, but I made mistakes again. I did end up with Invisibility, but opted for rolling on Santic with my Warlord Librarian. With such small units running around on my side, I'm not sure fishing for Invisibility was the best idea. I decided against Deep Striking anything in (and without Gate of Infinity walking the terminators acrossed the board was painful), because the name of this game for me wasn't about winning but just trying to endure what I could.
First turn he failed to do any significant damage. I was out of range of most of his guns. He shot two Interceptors dead and they ended up failing morale. I'll note now that my dice were ridiculous. I was literally rolling 1s and 2s or 5s and 6s - there was no middle ground. I'm pretty sure I rolled about average, but ended up rolling 1s and 2s for saving throws, and 5s and 6s for casting powers and morale and the like. My dice were possessed with a Chaos Daemon that wanted my Grey Knights to fail. When it was my turn, I shunted three of my Dreadknights in front of his army and inside the Void Shield (why not 4? well, one of my Dreadknights failed that Pinning warlord thing...awesome). I decided against shunting all my Interceptors, but in hindsight that was a bad idea. He was playing to do damage, so playing total gunline. I should have given myself some Turn 2 charges by placing the majority of my army in his face instead of just three Dreadknights. I cast powers and he denied 1 Sanctuary, but the other two suffered Perils (all those Perils I should have gotten in my game against you came out in this one) - and each Perils was a friggin' result of 1. Blargh. I passed my Leadership checks, sure, but ended up killing half a Dreadknight worth of Wounds on my own. I cast Invisibility on the Terminator unit, but I should have tossed it on a Dreadknight that was in his face. I killed some stuff, but nothing significant. So I had to endure his next round of shooting to get off some Dreadknight charges next turn...
...and three Dreadknights died. It took his entire armies' firepower, but he did manage to finish off every wound on the three Dreadknights I had. I was rolling pretty poorly on a lot of saves, so that's nice to be aware of. If I hadn't Perils in the worst way during Turn 1 it was pretty likely I'd have two alive Dreadknights ready to charge (even if they were a bit wounded it would have been enough to start wrecking stuff). My un-Pinned Dreadknight shunted along with my Interceptors. I did some damage, but nothing significant. I tossed Invisibility on to the lone Dreadknight, but it wouldn't matter in the end. The game went on another turn or so before I gave up when he brought down the last Dreadknight in Overwatch.
In the end, I learned exactly what I set out to - the durability of my army while facing down a ridiculously fierce shooting list with the worst odds against me (not having a choice of deployment, going first, and the worst deployment type against a gunline army). There were obvious things I could have done better, but I opted to play a bit more simply to better gauge my armies' defenses.
 |
| A picture of my army after the game. |
Battle Report #1: vs. Orks!
I forgot to take some photos. Boo. I'll start putting more effort into remember from this point onward. This is going a bit from memory, as well, since we played this out last Thursday. First up are the lists!
Grey Knights
HQ - Librarian
Troop - Strike Squad x5, Incinerator
Troop - Terminators x5, Daemon Hammer, Psycannon
Dedicated Transport: Land Raider
Elite - Dreadnought
Fast Attack - Interceptors x10, x2 Incinerators
Heavy Support - Dreadknight, Sword, Teleporter, Heavy Psycannon, Heavy Incinerator
Heavy Support - Dreadknight, Sword, Teleporter, Heavy Psycannon, Heavy Incinerator
Heavy Support - Dreadknight, Sword, Teleporter, Heavy Psycannon, Heavy Incinerator
Lord of War - Draigo
*This list was just filling points. With all the rushing to get stuff built for gaming, this was what ended up being fielded.
--------
Orks
HQ - Warboss, Mega armor, Lucky Stick, Bosspole
HQ - Painboy
HQ - Painboy /w bosspole
HQ - Painboy /w bosspole
Troop - Boys, quantity a lot, Nob /w Power Claw
Troop - Boys, quantity a lot, Nob /w Power Claw
Troop - Boys, quantity a lot, Nob /w Power Claw
Troop - Gretchin x10
Elite - Meganobs x3, Truk
Elite - Meganobs x3, Truk
Elite - Meganobs x3, Truk
Elite - Meganobs x3, Truk
Elite - Tankbustas x5, Truk
Elite - Tankbustas x5, Truk
Heavy Support - Battlewagon
Heavy Support - Battlewagon
Heavy Support - Battlewagon
*Going off memory, so I'm sure this isn't an exact list but it's pretty close to what I went up against. There were other upgrades on stuff, but it's closing in at 2,000 points there.
--------
Deployment was something like:

We were playing the Maelstrom of War mission where you draw up to as many objectives as you control.
Grey Knights
HQ - Librarian
Troop - Strike Squad x5, Incinerator
Troop - Terminators x5, Daemon Hammer, Psycannon
Dedicated Transport: Land Raider
Elite - Dreadnought
Fast Attack - Interceptors x10, x2 Incinerators
Heavy Support - Dreadknight, Sword, Teleporter, Heavy Psycannon, Heavy Incinerator
Heavy Support - Dreadknight, Sword, Teleporter, Heavy Psycannon, Heavy Incinerator
Heavy Support - Dreadknight, Sword, Teleporter, Heavy Psycannon, Heavy Incinerator
Lord of War - Draigo
*This list was just filling points. With all the rushing to get stuff built for gaming, this was what ended up being fielded.
--------
Orks
HQ - Warboss, Mega armor, Lucky Stick, Bosspole
HQ - Painboy
HQ - Painboy /w bosspole
HQ - Painboy /w bosspole
Troop - Boys, quantity a lot, Nob /w Power Claw
Troop - Boys, quantity a lot, Nob /w Power Claw
Troop - Boys, quantity a lot, Nob /w Power Claw
Troop - Gretchin x10
Elite - Meganobs x3, Truk
Elite - Meganobs x3, Truk
Elite - Meganobs x3, Truk
Elite - Meganobs x3, Truk
Elite - Tankbustas x5, Truk
Elite - Tankbustas x5, Truk
Heavy Support - Battlewagon
Heavy Support - Battlewagon
Heavy Support - Battlewagon
*Going off memory, so I'm sure this isn't an exact list but it's pretty close to what I went up against. There were other upgrades on stuff, but it's closing in at 2,000 points there.
--------
Deployment was something like:
Eh, um ... not quite like that. We placed Objectives, with two on one side's deployment zone, three spaced evenly in the middle of the board, and one in the unlucky person's deployment zone. This was intentional on my part, as I only have one back-field objective holder, so I didn't really want to play a game where I ended up leaving behind too many units just to stack on objectives. I won the roll-off to choose my side, and I chose the one with two objectives amusingly. Looking at his army, I knew it was coming for me, so I'd rather sit back on more objectives and get in my better shooting on his open-topped vehicles.
I rolled Infiltrate as my Warlord trait (yeah, that's right - my Librarian was my Warlord), but opted to not Infiltrate very far up at all since apparently you can't charge in a "model's first turn" when you infiltrate. There's isn't a FAQ stating otherwise, so maybe people aren't realizing this change in 7th?
But anyways. I won the roll-off to go first and opted to infiltrate the terminators and all three dreadknights. Since I was going to deep strike the Strike Squad, this left my initial deployment with just a Land Raider, Dreadnought, and my combat-squaded Interceptors. He spread out quite a bit, with a Battle wagon and cargo ready to charge where-ever I ended up putting some points down. His Meganobs didn't start in their Trukks, on the chance I decided to just blow them up and stop them from going anywhere in the first turn (which would have ended up being all game). I placed a Dreadknight facing off against (and in cover) each Battlewagon and kept Draigo and company in the center of my deployment area. After deployment was completely finished I decided I'd rather go second (since he had little shooting, and any movement on my part would put something in a potential charge range).
-----------
Turn 1 for him was just advancing and taking some failed pot shots at things. My first turn was flaming and positioning around a bit. My Land Raider's lascannon got a bit lucky and took down his Warlord's battlewagon with one shot. Draigo and company fired at the wreck and ended up making an 11" charge - something I should have postponed, but they did substantial damage to the unit. To sum up my first round would be to just explain how Str 6, AP 4 flamers rip through open-topped vehicles and their contents pretty easily. He lost about 1/4 of his army.
Turn 2 saw a charge on a Dreadknight and a multi-charge on two units of interceptors that shunted up the board to grab mid-field and his back-field objective. He determined that the multi-charge was a bad idea afterwards, since he lost a lot of his attacks and a substantial portion of his unit from so many power weapon swings. He was run down. He sent a unit of Meganobs into Draigo, and while Draigo and company pulled out some awesome kills (including killing his Warlord), the ensuing Powerklaw meganob damage also finished off my unit. Ouch. Another unit of meganobs also charged and took down a Land Raider.
Turn 3 was the end of the game. His turn went alright, considering I had 3 untouched Dreadknights ready to bare down on his army. I drew my objectives and got two new GK ones - the one where if I shunt and kill a unit I get VPs and the one where when I draw it my opponent chooses and objective and I get 1 VP if I claim it (or d3 if I claim it the turn he chooses it). I should note that I've been holding on to Supremacy and Domination (secure 2 objectives and twice as many as my opponent, and secure all objectives on the board). With DK shunts and jump infantry, even with half his army alive I was able to grab all the objectives (with my DK shunting and killing the unit contesting one of them - which also happened to be the objective he chose for my other card). I was close to 15 VPs by the end of Turn 3 and he decided to call the game. He still had some damage dealers in meganob units, but that was pretty much all he had left to deal with my army and they were all on foot by this point against my jump infantry. Considering my Dreadknights attack first and inflict instant death on the meganobs, it would also take some really lucky rolling on his point.
I want to note that my opponent is a good friend, a great player, and the person that taught me the game. It wasn't completely one-sided, but the end result was brutal in hindsight, and the worst I've ever beaten him by (and with my Necrons I've had his 'Nids left with only a Flyrant on a few occassions, but even still the VP total was pretty close).
---------
I did manage to get a picture of the end of the game, however.
-cough-
---------
With Thanksgiving this Thursday, I don't think I'll get in another game before the tournament. Boo.
The Grey Knights Cometh.
I've been hard at work getting as much of my army assembled as I can. Nov. 29th is a local tournament that I'm trying to get 2,000 points together for. Rather, trying to find the right 2,000 points worth of GKs to bring. It's likely the list will look similar to:
HQ - Librarian, ML 3
HQ - Librarian, ML 3
Troop - Terminators x5, Psycannon, Daemon Hammer
Troop - Strike Squad x5, Incinerator
Fast Attack - Interceptors x10, x2 Incinerators
Fast Attack - Interceptors x10, x2 Incinerators
Heavy Support - Dreadknight, Greatsword, Teleporter, heavy incinerator, heavy psycannon
Heavy Support - Dreadknight, Greatsword, Teleporter, heavy incinerator, heavy psycannon
Heavy Support - Dreadknight, Greatsword, Teleporter, heavy incinerator, heavy psycannon
Heavy Support - Dreadknight, Greatsword, Teleporter, heavy incinerator, heavy psycannon
It's a tad spammy, but going through the in's and out's of the codex and playstyle will take a bit of time. While I got a pretty good game in last Thursday, I should only have time for another game before the tournament hits - so trying to reduce time sorting through bad lists. I'm also waiting for my fourth Dreadknight purchase to get sent from eBay. If it gets sent tomorrow then it should arrive with just enough time for me to assemble it. However, if it doesn't (since I ordered it over a week ago), I'm going to have to purchase my fifth one sooner than expected.
Fully assembled so far:
With so many Dreadknights (I hope to have 5 by the time I'm finished collecting the army), I took particular care in assembly to get them posed a bit different and looking relatively unique. Better shots of each so far:
The flaming effect isn't finished drying. For any curious parties, it's just a paper clip superglued into each hole of the flamer with green stuff tossed on to form the bulk of the flame. Paste Water Effects was added with an hold brush and spread around until I was happy with the shape. I then used the same brush to do lite stippling on the effect to create the flames. Afterwards I had to add more Water Effects paste since the flamer seemed a bit lopsided, and that's what's drying now.
HQ - Librarian, ML 3
HQ - Librarian, ML 3
Troop - Terminators x5, Psycannon, Daemon Hammer
Troop - Strike Squad x5, Incinerator
Fast Attack - Interceptors x10, x2 Incinerators
Fast Attack - Interceptors x10, x2 Incinerators
Heavy Support - Dreadknight, Greatsword, Teleporter, heavy incinerator, heavy psycannon
Heavy Support - Dreadknight, Greatsword, Teleporter, heavy incinerator, heavy psycannon
Heavy Support - Dreadknight, Greatsword, Teleporter, heavy incinerator, heavy psycannon
Heavy Support - Dreadknight, Greatsword, Teleporter, heavy incinerator, heavy psycannon
It's a tad spammy, but going through the in's and out's of the codex and playstyle will take a bit of time. While I got a pretty good game in last Thursday, I should only have time for another game before the tournament hits - so trying to reduce time sorting through bad lists. I'm also waiting for my fourth Dreadknight purchase to get sent from eBay. If it gets sent tomorrow then it should arrive with just enough time for me to assemble it. However, if it doesn't (since I ordered it over a week ago), I'm going to have to purchase my fifth one sooner than expected.
Fully assembled so far:
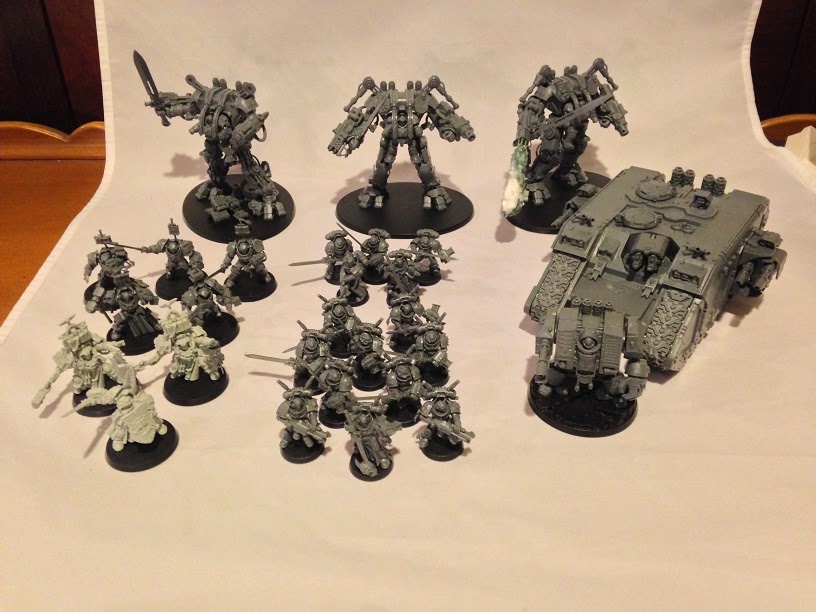 |
| Assembled Grey Knights as of 11/23/14 |
With so many Dreadknights (I hope to have 5 by the time I'm finished collecting the army), I took particular care in assembly to get them posed a bit different and looking relatively unique. Better shots of each so far:
 |
| Nemesis Dreadknight "At the ready". |
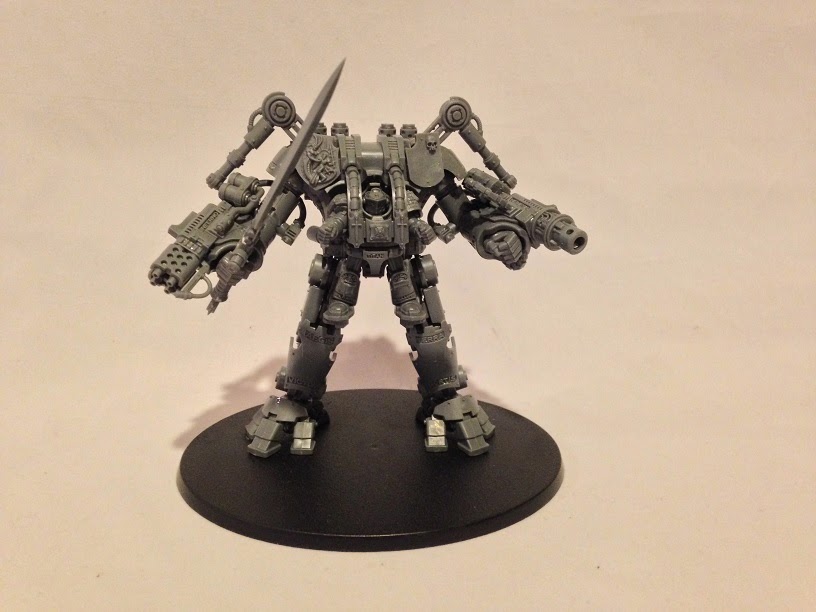 |
| Nemesis Dreadknight "Prepared for battle". |
 |
| Nemesis Dreadknight "Flame on!". |
The flaming effect isn't finished drying. For any curious parties, it's just a paper clip superglued into each hole of the flamer with green stuff tossed on to form the bulk of the flame. Paste Water Effects was added with an hold brush and spread around until I was happy with the shape. I then used the same brush to do lite stippling on the effect to create the flames. Afterwards I had to add more Water Effects paste since the flamer seemed a bit lopsided, and that's what's drying now.
Subscribe to:
Posts (Atom)